Category Archives: Hacking
#Python : debugging your python processes with GDB
PyCharm is an awesome IDE, and its debugger is a massively useful tool to help in code development.
However, there are instances where the bug express itself only at runtime in conditions that are hard to reproduce on the developer machine or where traces are not available. Example of these types of bugs that are difficult to debug from within Python are:
- segfaults (not uncaught Python exceptions)
- hung processes (in cases where you can’t get a Python traceback or debug with pdb)
- out of control daemon processes
- python processes running in a Docker container in a production environment
In these cases, you can try gdb.
Let’s take the case of your python process running in a Docker container. You can get a shell into the container and install a couple of packages (e.g., for Ubuntu Linux):
#apt-get install gdb python2.7-dbgNow you are ready to debug your process either interactively
#gdb python

...

(gdb) run [program name].py [arguments]
or automatically:
#gdb -ex r --args python [program name].py If the process is already running (which will be the case if in production and the bug did not cause the process to terminate):
#gdb python [pid of process]
Happy debugging! 😎
#Kali Linux: TP-LINK WN821N Compatible Wireless Adapter for Mac OS X and VMware Fusion
The list of compatible adapters is often very short, and confusing because the support depends on the operating system and often it breaks when updating Kali.
In particular, nothing is said about Mac OS X compability.
Here the good news, I tested the TP-LINK WN821N USB adapter and it seems to work properly in Kali Linux 2016.x installed in VMware Fusion (VMware Fusion 8.5.3 on Mac OS X El Capitan 10.11.6). The TP-LINK WN821N is athereos based and it supports 802.11n standard at 300 Mbps and it is quite cheap. You can buy it on Amazon HERE. Stay away from TP-LINK Archer T4UH (AC1200) which is Realtek based and its Linux drivers are badly outdated (but it is a good adapter under Windows, with over 200Mbps throughput).
These are the very basic steps:
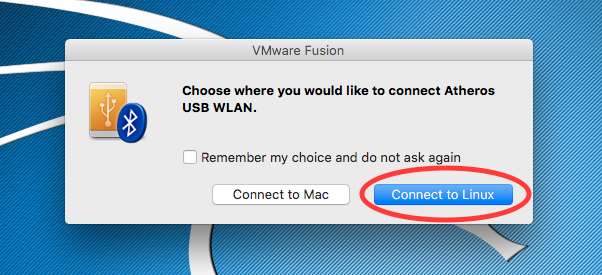
- Once you booted the system and logged in as root, you can connect the USB wireless adapter. VMWare will ask you to select if connect it to Linux or to the Mac. Select to connect it to Linux.

- You should now see the adapter in
airmon-ng

- You can then start
airmong-ng. The command show the interface created for monitoring.

- The final steps are to run
airodump-ngto extract the MAC addresses and useairplay-ngto lunch a deauthentication attack. For the full tutorial see HERE.


#Kali Linux: Install VMware Tools
If you are running a recent version of VMware Player, VMware Workstation, or VMware Fusion along with a recent Linux Kernel (>=4.4), then the recommended way to install VMware tools is to use the package for Open VM Tools (OVT) provided by your distribution. For Kali Linux
#apt-get install open-vm-tools-desktopThat’s it you are all set. If you do not like it, you can always go with the old way.
#Kali Linux: fix sources.list
If you are running Kali Linux 2016.x which is in a rolling release, you might need to update the source list for apt in order to update the system.
If you see something like the following:
#apt-get updateReading package list... Doneit means your sources.list file needs to be fixed.
In this case you can use this one-liner from the root prompt:
#echo "deb http://http.kali.org/kali kali-rolling main contrib non-free" >> /etc/apt/sources.listNow you can update your system:
#apt-get update && apt-get upgrade -y#cURL : HOWTO [UPDATED]
You can use the cURL library and the curl command to design your own Request and explore the Response. There are many possible uses like e.g., API debug, web hacking, pen testing.
curl is a tool to transfer data from or to a server, using one of the supported protocols (e.g., FTP, GOPHER, HTTP, HTTPS, IMAP, LDAP, POP3, RTMP, SCP, SFTP, SMTP, TELNET). The command is designed to work without user interaction.
curl offers a busload of useful tricks like proxy support, user authentication, FTP upload, HTTP post, SSL connections, cookies, file transfer resume, Metalink, and more. As you will see below, the number of features will make your head spin!
So curl is a truly powerful command, however it does at the cost of complexity. Here I will show some real-world use cases.
URL
The URL syntax is protocol-dependent. If you specify URL without protocol:// prefix, curl will attempt to guess what protocol you might want. It will then default to HTTP but try other protocols based on often-used host name prefixes. For example, for host names starting with “ftp.” curl will assume you want to speak FTP.
You can specify multiple URLs or parts of URLs by writing part sets within braces as in:
curl en.wikipedia.org/wiki/{FTP,SCP,TELNET}or you can get sequences of alphanumeric series by using [ ] as in:
curl forums.macrumors.com/showthread.php?t=[1673700-1673713]curl numericals.com/file[1-100].txtcurl numericals.com/file[001-100].txtcurl letters.com/file[a-z].txtNested sequences are not supported, but you can use several ones next to each other:
curl any.org/archive[1996-1999]/vol[1-4]/part{a,b,c}.htmlYou can specify any amount of URLs on the command line. They will be fetched in a sequential manner in the specified order.
You can specify a step counter for the ranges to get every Nth number or letter:
curl numericals.com/file[1-100:10].txtcurl letters.com/file[a-z:2].txtTrace Dump
In order to analyze in depth what we send and receive we might save everything on a file, this is as easy as:
curl --trace-ascii DebugDump.txt URLSave To Disk
If you want save the Response to disk you can use option -o <file>. If you are using {} or [] to fetch multiple documents, you can use ‘#‘ followed by a number in the specifier. That variable will be replaced with the current string for the URL being fetched. Remember to protect the URL from shell by adding quotes if you receive the error message internal error: invalid pattern type (0). Examples:
curl 'en.wikipedia.org/{FTP,TFTP,SFTP}' -o "#1.html"curl arxiv.org/pdf/13[01-11].36[00-75].pdf -o "arXiv13#1.36#2.pdf"Option -O writes output to a local file named like the remote file we get (only the file part of the remote file is used, the path is cut off). The remote file name to use for saving is extracted from the given URL, nothing else. Consequentially, the file will be saved in the current working directory. If you want the file saved in a different directory, make sure you change current working directory before you invoke curl:
curl -O arxiv.org/pdf/1301.3600.pdfOnly the file part of the remote file is used, the path is cut off, thus the file will be saved as 1301.3600.pdf.
Set HTTP Request Method
The curl default HTTP method, GET, can be set to any method you would like using the -X <command> option. The usual suspects POST, PUT, DELETE, and even custom methods, can be specified:
curl -X POST echo.httpkit.comNormally you don’t need this option. All sorts of GET, HEAD, POST and PUT requests are rather invoked by using dedicated command line options.
Forms
Forms are the general way a web site can present a HTML page with fields for
the user to enter data in, and then press some kind of ‘submit’
button to get that data sent to the server. The server then typically uses
the posted data to decide how to act. Like using the entered words to search
in a database, or to add the info in a bug track system, display the entered
address on a map or using the info as a login-prompt verifying that the user
is allowed to see what it is about to see.
Using the -d option we can specify URL encoded field names and values:
curl -d "prefisso=051" -d "numero=806060" -d "Prosegui=Verifica" -d "form_name=verifica_copertura_ehiveco" http://www.ovus.it/verifica_copertura_ehiveco.php
A very common way for HTML based application to pass state information between pages is to add hidden fields to the forms. Hidden fields are already filled in, they aren’t displayed to the user and they get passed along just as all the other fields. To curl there is no difference at all, you just need to add it on the command line.
Set Request Headers
Request headers allow clients to provide servers with meta information about things such as authorization, capabilities, and body content-type. OAuth2 uses an Authorization header to pass access tokens, for example. Custom headers are set in curl using the -H option:
curl -H "Authorization: OAuth 2c4419d1aabeec" http://echo.httpkit.comcurl -H "Accept: application/json" -H "Authorization: OAuth 2c3455d1aeffc" http://echo.httpkit.comNote that if you should add a custom header that has the same name as one of the internal ones curl would use, your externally set header will be used instead of the internal one. You should not replace internally set headers without knowing perfectly well what you’re doing. Remove an internal header by giving a replacement without content on the right side of the colon, as in: -H "Host:".
If you send the custom header with no-value then its header must be terminated with a semicolon, such as -H "X-Custom-Header;" to send "X-Custom-Header:".
curl will make sure that each header you add/replace is sent with the proper end-of-line marker, you should thus not add that as a part of the header content: do not add newlines or carriage returns, they will only mess things up for you.
Referer
A HTTP request may include a referer field (yes it is misspelled), which can be used to tell from which URL the client got to this particular resource. Some programs/scripts check the referer field of requests to verify that this wasn’t arriving from an external site or an unknown page. While this is a stupid way to check something so easily forged, many scripts still do it.
This can also be set with the -H, --header flag of course. When used with -L, --location you can append ";auto" to the --referer URL to make curl automatically set the previous URL when it follows a Location: header. The ";auto" string can be used alone, even if you don’t set an initial --referer.
curl -e google.com http://echo.httpkit.comUser Agent
To specify the User-Agent string to send to the HTTP server you can use --user-agent flag. To encode blanks in the string, surround the string with single quote marks. This can also be set with the -H, --header option of course. Many applications use this information to decide how to display pages. At times, you will see that getting a page with curl will not return the same page that you see when getting the page with your browser. Then you know it is time to set the User Agent field to fool the server into thinking you’re one of those browsers:
curl -A "Mozilla/5.0 (iPhone; U; CPU iPhone OS 4_3_2 like Mac OS X; en-us) AppleWebKit/533.17.9 (KHTML, like Gecko) Version/5.0.2 Mobile/8H7 Safari/6533.18.5" http://echo.httpkit.comCookies
The way the web browsers do “client side state control” is by using cookies. Cookies are just names with associated contents. The cookies are sent to the client by the server. The server tells the client for what path and host name it wants the cookie sent back, and it also sends an expiration date and a few more properties.
When a client communicates with a server with a name and path as previously specified in a received cookie, the client sends back the cookies and their contents to the server, unless of course they are expired.
Many applications and servers use this method to connect a series of requests into a single logical session. To be able to use curl in such occasions, we must be able to record and send back cookies the way the web application expects them. The same way browsers deal with them.
It is supposedly the data previously received from the server in a "Set-Cookie:" line. The data should be in the format "NAME1=VALUE1; NAME2=VALUE2".
If no = symbol is used in the line, it is treated as a filename to use to read previously stored cookie lines from, which should be used in this session if they match. Using this method also activates the “cookie parser” which will make curl record incoming cookies too, which may be handy if you’re using this in combination with the -L, --location option. The file format of the file to read cookies from should be plain HTTP headers or the Netscape/Mozilla cookie file format. NOTE that the file specified with -b, --cookie is only used as input. No cookies will be stored in the file. To store cookies, use the -c, --cookie-jar option or you could even save the HTTP headers to a file using -D, --dump-header:
curl --cookie "name=whitehatty" http://echo.httpkit.comcurl -c cookies.txt http://www.facebook.comsed -i '' s/#HttpOnly_\.facebook\.com/echo\.httpkit\.com/g cookies.txtcurl --cookie cookies.txt http://echo.httpkit.comcurl -b cookies.txt --cookie-jar newcookies.txt http://echo.httpkit.comcurl --dump-header headers_and_cookies http://www.facebook.comWork In Progress…
Ok there are many more options, but I will stop here for now. I will add something in the future, so if you have any request (like using more real urls) just leave a comment.
#MacOsX : Web Hacking with Burp Suite
This is a legendary tool developed by the author of The Web Application Hacker’s Handbook: Finding and Exploiting Security Flaws (2nd edition).
Unfortunately there is no native Mac Os X version but Corsaire packed one. Since they updated the site, the link to download it provided in the aforementioned book is broken, so I will provide a new working one of the recently released version 1.5 1.6 of Burp Suite Free.
All rights reserved to Corsair and Portswigger.
The version at this link
DOWNLOAD HERE
is now outdated (it also requires JDK 6, which is no longer supported).
A free binary version for Mac OS has been made available:
Burp Suite Free Edition
See also here for a [much less powerful] alternative.
#MacOsX : Enable Quicklook Text Selection [OUTDATED]
Quicklook is a beautiful and powerful feature of Mac Os X (take a look here to know what is capable of) but it is somewhat weird that it doesn’t allow text selection.
To enable text selection in Quicklook:
defaults write com.apple.finder QLEnableTextSelection -boolean YES
killall Finder
NOTE: this trick stopped working with Mac OS X 10.11 and later.
#MacOsX : Show Remote Disks
There are Macs without disk drives. You can access CD/DVDs from another Mac over the network allowing remote disk.
This option allows you to always see remote drives within Finder:
defaults write com.apple.finder EnableODiskBrowsing -boolean YES
killall Finder
#MacOsX : Web Hacking with Paros
Paros is a web proxy that allows to intercept and modify all HTTP and HTTPS data between server and client, including cookies and form fields.
I will not explain how and why you use it, but if you are really interested, please take a look on the book: The Web Application Hacker’s Handbook: Discovering and Exploiting Security Flaws.
Unfortunately there is no native Mac Os X version but Corsaire packed one. Since they updated the site, the link to download it provided in the aforementioned book is broken, so I will provide a new working one. All rights reserved to Corsair and Paros Team.
Paros is no longer developed (it also requires JDK 6 which is not longer supported).
An alternative is a fork of it, Zed Attack Proxy, maintained by OWASP:
Zed Attack Proxy (ZAP)
#CryptDB : HOWTO Compile on Ubuntu Linux [UPDATE 2]
First, what is CryptDB.
A SHORT PRESENTATION, very useful to understand how it works.
Second, reference system: Ubuntu Linux LTS 12.04.x 32bit 64bit (see this comment).
Third, [NEW] installation:
sudo apt-get udatesudo apt-get install git rubygit clone -b public git://g.csail.mit.edu/cryptdbcd cryptdbsudo ./scripts/install.rb .Done. It’s that simple now 😎
If it fails to compile, see THIS comment.
If you still do not succeed see THIS comment.
With recent version of Ubuntu (14.04 and 16.04) you might need to downgrade Bison, see THIS comment.
[OLD] installation:
- install needed packages:
sudo apt-get install automake bison bzr cmake flex g++ git gtk-doc-tools libaio-dev libbsd-dev libevent-dev libglib2.0-dev libgmp-dev liblua5.1-0-dev libmysqlclient-dev libncurses5-dev libntl-dev libssl-dev - create a directory, then download software to compile:
mkdir $HOME/cryptdb-inst

cd $HOME/cryptdb-inst

git clone -b public git://g.csail.mit.edu/cryptdb

wget http://es.csail.mit.edu/mysql-5.5.14.tar.gz

bzr branch lp:mysql-proxy - compile mysql-proxy:
cd mysql-proxy

sh ./autogen.sh

./configure --enable-maintainer-mode --with-lua=lua5.1

make

sudo make install - build CryptDB on MySQL:
cd $HOME/cryptdb-inst

tar xzf mysql-5.5.14.tar.gz

cp -R cryptdb/parser/mysql_mods/* mysql-5.5.14/

rm mysql-5.5.14/sql/sql_yacc.{cc,h}

cd mysql-5.5.14

mkdir build

cd build

cmake -DWITH_EMBEDDED_SERVER=ON ..

make

sudo make install

cd /usr/local/mysql

sudo chown -R mysql .

sudo cp support-files/my-medium.cnf /etc/my.cnf

sudo scripts/mysql_install_db --user=mysql --basedir=/usr/local/mysql/

sudo /usr/local/mysql/bin/mysqld_safe --lc-messages-dir="/usr/local/mysql/share/english/"

/usr/local/mysql/bin/mysqladmin -u root password 'letmein'
- Build CryptDB:
cd $HOME/cryptdb-inst/cryptdb

cp conf/config.mk.sample conf/config.mk

sed -i'' -e"1s%/home/nickolai/build%$HOME/cryptdb-inst%" conf/config.mk

make

sudo make install
- now, it’s time to read
cryptdb/doc/README, enjoy! 😉
NOTE1: you should create a user mysql to run DBMS for security reasons:
sudo groupadd mysql
sudo useradd -r -g mysql mysql
NOTE2: be very careful on each step and you wont fail.
#WP7 : LG Optimus 7 Unlock + Interop Unlock + Root Tools
If you want install XAP files without a developer account you can do it by modifying some registry keys:
- First go to MFG and follow the path 7.Engineer Menu > 6.Other Settings > Edit Registry
- Set the following fields:
- Select ROOT_PATH: HKEY_LOCAL_MACHINE
- Input SUB_PATH: Comm\Security\LVMod
- Input KEY and Select data type: DeveloperUnlockState DWORD
- Input data: 1
- Click Set button
To avoid Zune undo to default settings:
- Go to MFG and follow the path 7.Engineer Menu > 6.Other Settings > Edit Registry
- Set the following fields:
- Select ROOT_PATH: HKEY_LOCAL_MACHINE
- Input SUB_PATH: Software\Microsoft\DeviceReg
- Input KEY and Select data type: PortalUrlProd DWORD
- Input data: leave this field empty
- Click Set button
- Go to MFG and follow the path 7.Engineer Menu > 6.Other Settings > Edit Registry
- Set the following fields:
- Select ROOT_PATH: HKEY_LOCAL_MACHINE
- Input SUB_PATH: Software\Microsoft\DeviceReg
- Input KEY and Select data type: PortalUrlInt DWORD
- Input data: leave this field empty
- Click Set button
From now on your device is unlocked in developer mode, but you cannot install homebrew apps that modify registry keys. You need Interop Unlock:
- Go to MFG and follow the path 7.Engineer Menu > 6.Other Settings > Edit Registry
- Set the following fields:
- Select ROOT_PATH: HKEY_LOCAL_MACHINE
- Input SUB_PATH: Software\Microsoft\DeviceReg\Install
- Input KEY and Select data type: MaxUnsignedApp DWORD
- Input data: 300
- Click Set button
NOTE1: if you want install very nasty apps then you need WP7 Root Tools.
NOTE2: Unlock & Interop Unlock works on WP7 Tango too.
NOTE3: to lock device again set DeveloperUnlockState to 0 (zero).
#MacOSX : IP Scanner Pro, Network Scanning for Dummies
You are accustomed to incomprehensible command line tools???
Finally I have the right solution: IP Scanner Pro
It’s all about friendlyness!!! You can ping, wake up, insert into whitelist, etc all the devices found with just one click.
I will show you just an image, you don’t need anything else! 😉

NOTE: I have hidden MAC address.
#MacOSX [*NIX]: MAC Address Spoofing
MAC Address is a unique identifier of 48 bits assigned to network interfaces.
This Address is unique in the world, so it does identify you, everywhere.
From a Security & Privacy perspective this is not good at all!!!
How to modify it:
- Open Terminal app.
- Type:
sudo ifconfig [en0-en1] ether [MAC Address]- where you can choose en0 for wired ethernet interface or en1 for airport interface
- MAC Address is something like FF:FF:FF:FF:FF:FF
where there are 6 groups of 2 exadecimal symbols separated by colons (:)
- Insert your Administrator password.
- Go to Network System Preferences, select active interface and push Advanced… button.
- In TCP/IP tab click on Renew DHCP Lease button.
- You should now see your new MAC Address in Hardware tab.
NOTE: you can set Configure: Manually in Hardware tab to manually set MAC Address and avoid using Terminal.
NOTE2: if you do not renew DHCP Lease you may loose network connectivity.
NOTE3: if you have set MAC Address through Terminal it will be restored to it own default after reboot or shutdown.
NOTE4: some Hotels or private Acces Point use MAC Filtering to prevent abuse of their network. The changing of MAC Address allow you circumviate this kind of restrictions (see MAC Spoofing). This is NOT legitimate, so if you are not an evil user and you need emergency network access, try to set your MAC Address to FF:FF:FF:FF:FF:FF (could not work of course). This way System Administrator will readily understand what is going on. 😉
