Category Archives: Tips & Tricks
#Docker: copy files and folders between a container and the local filesystem
Container technology lead to a dramatic shift in computing paradigms and it is exceptionally useful in contexts where platform independence and reproducibility are important factors. This is the case for example in Machine Learning and AI applications. Containers are at the base of ML platforms such as Michelangelo (Uber), Bighead (Airbnb), Databricks, Domino, etc.
So now you are happily running your stuff in containers and tinkering around, when you need to pull out a file from one of them for e.g., check the output of an algorithm is correct, or you need to paste a directory containing a new shiny hand-made dataset to quickly test. If this was a linux machine you could just use scp command and call it a day, so you will be glad docker now offers its own cp-like command.
So for example let’s say we want to copy the file output.txt that is saved in the home of a running container to our desktop for some analysis. We grub the container id using docker ps command (in these examples b0e70cca9782) and we issue the following command:
#docker cp b0e70cca9782:/home/output.txt ~/DesktopLikewise, if we have a directory containing test images and we want to copy it in the home directory of the container to test our algorithm further we can do:
#docker cp ~/Desktop/images b0e70cca9782:/home/#Linux : use grep to extract lines around a pattern match
In the text processing toolkit of every sys admin or data scientist out there there is a well known command line utility of which utility is second to none (ok, maybe sed is a strong contender): grep.
So “grepping” has become a known term among developers and it has the same meaning as “googling”, that is find something that matches my query in this file. Grep will return the list of rows matching the specified pattern.
However sometimes it is useful to have some context around the pattern match, especially if we are talking about system logs; in this case grep has a couple of little known flags that are super useful: -A, for after the pattern match, and -B for before.
For example to display 10 lines before and 15 lines after any system log line that contains the word error:
#journalctl --no-pager | grep "error" -A 15 -B 10#Linux : data processing with awk
As a data scientist, a lot of time is spent into parsing and processing data to transform it into a nicer format that can be easily fed to whichever algorithm is being used. This process is often known as ETL.
There are a number of tools for the job ranging from command line utils, language libraries, and even whole products that go all the way to Petabyte scale (e.g., Spark).
Here I will give one tip for a unix/linux command line util that is often forgotten but that has a lot of functionality, it is fast and memory efficient (can process tens of thousands of rows per second, scale to multiple cores by using unix pipelining), and it is available pretty much anywhere (while your preferred tool or library might not). The awesome AWK!
Now, AWK can do pretty much anything, but here are just 2 bits that are exceptionally useful as a starting point of our data processing.
- Select by column (e.g, select a field of a csv file) is achieved by using the special variable $i where i is the column position we want to select, e.g., to print the second column
#awk -F "\"*,\"*" '{print $2}' filename.csv - Select by row (e.g., iterate through a csv file) is achieved using the built-in variable FNR, e.g., to print the second row
#awk 'FNR == 2 {print}' filename.csv
For a primer you can look HERE. Happy AWKing! 😎
#MacOsX : Terminal Cheat Sheet
If you are a *nix geek like me you can’t but love the command prompt.
One of the best tool to improve the plain old terminal is an utility called tmux. You can install through Homebrew.
Now, there are many commands to remember to play nicely with the terminal, and sometimes a little remind might be useful, that’s why cheat sheets exist.
Here is mine, enjoy.
#MacOsX : SSH SOCKS Proxy (SSH Tunnel Web Traffic)
After PRISM scandal you may feel the need to secure your connection and protect your privacy. Then it is a good idea to tunnel web traffic through a secure encrypted connection. This allows your traffic to traverse a local network without being visible to snoopers, even when visiting unencrypted web sites.
What you need:
- a modern browser like Firefox, Chrome or Safari (they support SOCKS4 protocol)
- ssh client (already installed in Mac Os X)
- a shell account (with ssh access)
If you don’t have a shell account, you can find a free one HERE, or HERE, or HERE, or HERE.
To start the local proxy type:
ssh -D PORT user@hostwhere PORT is a local port between 1024 and 65535 (they do not require super user privileges), user is the username at the remote machine, and host is the identifier of the remote host.
That’s not enough, you need to configure the system to use the proxy. Go to System Preferences > Network > [select active interface] > Advanced... > Proxies and check SOCKS Proxy.
Then modify SOCKS Proxy Server info to use the PORT you chose before.
That’s it! From now on all connections on the active network interface will be tunneled through the proxy. 😎
NOTE1: you may want use proxy browser settings instead of system wide proxy settings, so you can tunnel only part of the traffic (e.g. the most sensitive one). This is easy, but the procedure slightly change between different browsers.
NOTE2: you may need to add the option -p HOST_PORT if the remote host doesn’t use the standard ssh port 22, e.g.:
ssh -D PORT user@host -p 666#MacOsX : Show Hidden Files and Folders
In *NIX systems file and folders beginning with a dot (e.g., .name) are not visible in the Finder (also known as file browser). Since Mac Os X it’s a certified UNIX that’s also the case. If you use the terminal you can use the command:
ls -aHowever, most people will use regular Finder. To enable view of hidden files in the Finder use this command:
defaults write com.apple.finder AppleShowAllFiles -bool TRUEand then restart the finder with the following command:
killall FinderTo revert the changes use the same command, but replace TRUE with FALSE.
#AmazonStudent : Save Money
If you are a student, you can save some bucks if you join Amazon Student, the beautiful thing is that it is absolutely free!!!
That’s not all, you can earn 5$ every time someone join thank to you!
Why don’t you take the time to offer me a free beer clicking the following link and registering? Thx you 😎
#MacOsX : vimrc
If you are looking to configure Vim you find the default configuration file in:
/usr/share/vim/vimrcCopy and rename it in your home directory:
cp /usr/share/vim/vimrc ~/.vimrcHowever it is bare minimal so it is better if you personalize it a bit. One very simple example is the following:
" Configuration file for vim

set modelines=0 " CVE-2007-2438
" Normally we use vim-extensions. If you want true vi-compatibility

" remove change the following statements

" Use Vim defaults instead of 100% vi compatibility

set nocompatible
" more powerful backspacing

set backspace=2
" Display line numbers on the left

set number
" Allow intelligent auto-indenting for each filetype

" and for "plugins that are filetype specific.

filetype indent plugin on
" Fallback when no filetype-specific indenting is enabled

set autoindent
" Enable syntax highlighting

syntax on
" Display the cursor position

 set ruler
" Don't write backup file if vim is being called by "crontab -e"

au BufWrite /private/tmp/crontab.* set nowritebackup

" Don't write backup file if vim is being called by "chpass"

au BufWrite /private/etc/pw.* set nowritebackup
#MacOsX : Fix Mountain Lion Slow Shutdown
Ok, actually there are many good reasons to wait a bit of time before send a SIGKILL to processes (like giving them time to write things on disk or finish an upload on the iCloud), however the “slow” shutdown could be annoying, so try this:
sudo launchctl unload /System/Library/LaunchDaemons/com.apple.coreservices.appleevents.plist
sudo defaults write /System/Library/LaunchDaemons/com.apple.coreservices.appleevents ExitTimeOut -int 2
sudo launchctl load /System/Library/LaunchDaemons/com.apple.coreservices.appleevents.plist
This set the shutdown timeout to 2 sec instead of the default value (20).
#VMware Fusion: Script to Easily Install VMware Tools [OUTDATED]
If you run a linux guest VM, every time you update the kernel you need to reinstall VMwareTools for optimal performances.
After selecting Virtual Machine > Install VMware Tools you need to untar the archive and then run a script that ask you many question, etc.
This can be very tedious, so this is a little script that minimize typing:
#!/bin/bashtar xzf /media/VMware\ Tools/VMwareTools-*.tar.gz -C /tmpumount /media/VMware\ Toolssudo /tmp/vmware-tools-distrib/vmware-install.pl -dmkdir -pv ~/Desktop/VMwareSharedrm -v ~/Desktop/VMwareShared/*if [ -d /mnt/hgfs ]thenln -sv /mnt/hgfs/* ~/Desktop/VMwareShared/fivmware-userVMware now recommends to use the open-vm-tools-desktop provided by the Linux distribution of your choice.
NOTE: -d option implies default answers to install script (most of the time they are ok)
NOTE2: the script create a directory on Desktop with all directories shared by the host system with the VM
NOTE3: this script has been tested only on Ubuntu 12.04 LTS
NOTE4: this script install native VMware Tools, if you want you can install open tools instead, but you can’t install both at the same time!
#MacOsX : Enable Quicklook Text Selection [OUTDATED]
Quicklook is a beautiful and powerful feature of Mac Os X (take a look here to know what is capable of) but it is somewhat weird that it doesn’t allow text selection.
To enable text selection in Quicklook:
defaults write com.apple.finder QLEnableTextSelection -boolean YES
killall Finder
NOTE: this trick stopped working with Mac OS X 10.11 and later.
#MacOsX : Show Remote Disks
There are Macs without disk drives. You can access CD/DVDs from another Mac over the network allowing remote disk.
This option allows you to always see remote drives within Finder:
defaults write com.apple.finder EnableODiskBrowsing -boolean YES
killall Finder
#Firefox : URL Keyword for Search Engines
Most browsers allow search to default search engine in address bar, but what if you want a different engine? You can switch on the right box, choose one and then start the search.
That’s suck!
So you can try this:
- click the little arrow in the search engine box to open the drop down menu.

- select Manage Search Engines…
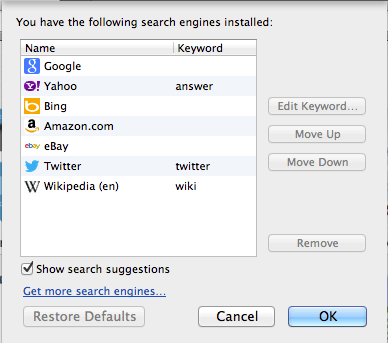
- select an engine and then click on Edit Keyword…
- add the keyword you prefer and then click OK


From now on, if you want make a search with the engine in the URL bar, construct your research like:
keyword query
Examples:
wiki power law distribution
answer AAPL growth
twitter Barack Obama
NOTE: if your keyword doesn’t work and your query is answered by the default search engine, try to change it! I have noticed that if you use the name of the service (e.g., Wikipedia, Yhaoo) most of the time the keyword doesn’t work. 😦
#Firefox & #Chrome : Fast Email Composer
If you are a pro, you know, you use the keyboard to do most of the work, right?
Then why click to open the mail client or a new compose window when you can do it in less then 10 character:
type
mailto:
in the address bar of your browser and let’s the magic happen! 😎
#MacOsX : How Cut & Paste Works in Mac OS X
Yep, Mac world is only about Drag & Drop but if you feel nostalgic of PC’s world you can move files the old way, just do this:
- selct file/files and hit
Command + C
- move to another location an hit
Command + Option + V
#MacOsX : Reset NVRAM, PRAM and SMC
Sometimes after a software (system) or hardware upgrade even Macs can have some problems; if you have tried every solution without success you could try this.
Every Mac stores certain settings in a special memory area even if it is turned off. On Intel-based Macs, this is stored in memory known as NVRAM; on PowerPC-based Macs, this is stored in memory known as PRAM.
Resetting NVRAM and PRAM may solve lot of problems and could be required if you upgrade SSD or Mac firmware (more tips on SSDs here).
Another step to try is Resetting the System Management Controller (SMC). An SMC reset should only be attempted after all other standard troubleshooting has been performed.
#MacOsX : Disable Auto-Save and Versions in Mac OS X
Auto-Save and Versions are excellent features in Mac OS X, but some advanced users are annoyed by them as they often don’t want to save intermediate versions of their work.
Moreover some apps write lots of data on disk (e.g. iMovie and iBooks Author) and this can shorten the life of SSD (look here for more tuning for SSDs).
If you know the name of the app plist you want to disable auto-save and Versions for, you can just plug the name into the defaults write command:
defaults write app-plist ApplePersistence -bool noIf you don’t know it then you can find it with the following command:
osascript -e 'id of application "NAME OF APP"'Now if you enter the Versions window, auto-save list will be empty and there are no versions to restore to. You’ll probably want turn off File Locking too.
NOTE: some sandboxed apps require another command in addition:
defaults write app-plist AutosavingDelay -int 0This is expecially true for TextEdit as it is the only Apple app that uses “old-style” autosaving and this causes issues with the sandbox in Lion/Mountain Lion.
NOTE2: It seems that the preference can be set globally but it may cause the login process to become very slow and possibly cause other unexpected behaviour:
defaults write -g ApplePersistence -bool no#MacOsX : Turn Off File Locking
Mac OS X Lion has introduced automatic file locking for files that hasn’t been edited recently.
To Disable File Locking:
- open System Preferences > Time Machine
- click on Options
- uncheck the box next to “Lock documents [2 weeks] after last edit” or modify the value as preferred
- done 🙂

