Category Archives: Apps
#MacOsX : Mavericks Improve Virtual Machine Graphic Performance
I have made a short benchmark comparison of Parallels vs Fusion 5.0 HERE. VMWare Fusion has reached version 5.0.3, but it looks like VMWare has become lazy and those updates are not worth mentioning. However Apple released Mavericks recently, with an updated graphic stack which has slightly better graphics performance:
| Component | Lion/Mountain Lion | Mavericks |
| Processor: | 4.4 | 4.4 |
| Memory (RAM): | 5.5 | 5.5 |
| Graphics: | 5.0 | 5.0 |
| Gaming graphics: | 4.2 | 4.3 |
| Primary hard disk: | 7.7 | 7.7 |
Moreover, VMs seem to boot much faster under Mac Os X Mavericks.
N.B. you need to update VMWare Fusion to version 5.0.3 in order to have the best experience in Mavericks (or install VMWare Fusion 6).
#Firefox : URL Keyword for Search Engines
Most browsers allow search to default search engine in address bar, but what if you want a different engine? You can switch on the right box, choose one and then start the search.
That’s suck!
So you can try this:
- click the little arrow in the search engine box to open the drop down menu.

- select Manage Search Engines…
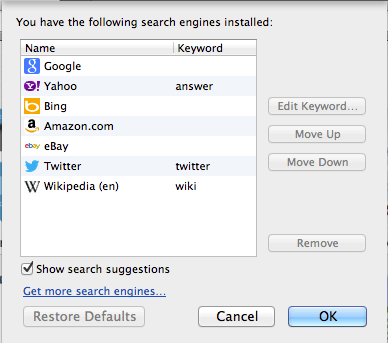
- select an engine and then click on Edit Keyword…
- add the keyword you prefer and then click OK


From now on, if you want make a search with the engine in the URL bar, construct your research like:
keyword query
Examples:
wiki power law distribution
answer AAPL growth
twitter Barack Obama
NOTE: if your keyword doesn’t work and your query is answered by the default search engine, try to change it! I have noticed that if you use the name of the service (e.g., Wikipedia, Yhaoo) most of the time the keyword doesn’t work. 😦
#Firefox & #Chrome : Fast Email Composer
If you are a pro, you know, you use the keyboard to do most of the work, right?
Then why click to open the mail client or a new compose window when you can do it in less then 10 character:
type
mailto:
in the address bar of your browser and let’s the magic happen! 😎
#MacOsX : VMware Fusion 5 vs. VMware Fusion 6 vs. VMware Fusion 7 vs. Parallels Desktop 7 [UPDATED]
I will not present functionalities here; it will be just a really brief benchmark.
Configuration:
- Hard Disk OCZ-AGILITY3 240 GB, firmware 1.15
- Graphics NVIDIA GeForce 9400M 256 MB
- Memory 8 GB 1333 MHz DDR3
- Processor 2.26 GHz Intel Core 2 Duo
- MacBook Pro 13-inch, mid 2009
- Software
- Hosts: Mac OS X Lion 10.7.4 (Parallels 7, Fusion 5), Mac OS X Mavericks 10.9.4 (Fusion 5, Fusion 6), Mac OS X Yosemite 10.10.4 (Fusion 6, Fusion 7)
- Guest: Windows 7
Some info:
- VMs have 2,5 GB RAM allocated
- VMs have 1 CPU allocated
- Parallels was tested when disk was new, while Fusion with half of the space occupied
- Parallels VM has optimize Windows performance on
- Fusion VM has disk buffering disabled
- Fusion 5.0.5, Fusion 6.0.4, and Fusion 7.1.2 were tested with Windows Aero OFF
| Component | Parallels 7.15106 | Fusion 5.0.[1-3] | Fusion 5.0.5 | Fusion 6.0.4 | Fusion 7.1.2 |
| Processor: | 4.4 | 4.4 | 4.4 | 4.4 | 4.4 |
| Memory (RAM): | 5.5 | 5.5 | 5.5 | 5.5 | 5.5 |
| Graphics: | 5.0 | 5.0 | 5.9 | 5.9 | 4.7 |
| Gaming graphics: | 4.4 | 4.2 | 5.1 | 5.2 | 4.2 |
| Primary hard disk: | 7.2 | 7.7 | 7.4 | 7.4 | 7.4 |
NOTE1: Fusion 5 seems to start and stop a bit slower than Parallels 7. Fusion 6 doesn’t improve, but SSD might be slower after this time than it was originally.
NOTE2: disabling Aero drastically improve Graphics performance, so do it!
NOTE3: Fusion 6 improve 3D Graphics performance over Fusion 5, but just slightly, so it is not worth an update. IMHO.
NOTE4: the combination of Mac OS X Yosemite and Fusion 7 has poor graphics performance. It is actually a big regression. I think Apple is to blame here.
#MacOSX : Subversion Server
You know, Mac OS X is a UNIX system based on FreeBSD, so you can do a lot of NERD things out of the box.
This time you will learn how to setup a Subversion Server:
- Open Terminal app
- Type:
mkdir -p /Library/Subversion/Repository

cd /Library/Subversion/Repository

svnadmin create myproject - Great! Now that you have created the first repository, you need to configure it; type:
vim /Library/Subversion/Repository/myproject/conf/svnserve.confYou’ll see ### commented lines. The lines with the single “#” comment marks are the ones we need to edit. You’ll want to remove the comments (#) and customize these settings to suit your project’s needs:
- password-db : this specify text file that stores the usernames and passwords of authorized users for your repository. Unless otherwise specified, it will be assumed that this file is stored in your projects “conf” directory. When you create your repository a “passwd” file is created by default.
- realm : realm tells clients what they are connecting to. It’s recommended you customize this to something like <Project Name> Subversion Repository.
- anon-access : this directive indicates what anonymous users are allowed to do with your repository. You should set it to none.
- auth-access : determines what permission level authorized users will have. In almost every case this will be set to write.
- Now you must edit password-db file; you can add as many users to your repository(s) as you want. Add at least one user for yourself so that you can begin committing to your repository:
vim /Library/Subversion/Repository/myproject/conf/passwd - Next you need to change permissions on the Repository directory so that svnserveis permitted to make changes to the files stored there:
sudo chown -R root:admin /Library/Subversion/Repository
sudo chmod -R ug+rwX,o= /Library/Subversion/Repository - Start Subversion Server:
svnserve -d -r /Library/Subversion/Repository - Check if it works:
cd
mkdir project
cd project
svn checkout --username <user> --password <user_password> svn://localhost/myproject - If it works you should have myproject directory in Repository. Well Done.
NOTE1: /Library/Subversion/Repository is just an appropriate example for Repository, but you can choose every other location.
NOTE2: in svnserve.conf and passwd files remove every white spaces at the beginning of non empty lines or it will not work.
NOTE3: if you want allow users to connect from internet you should set port forwarding on TCP port 3690 (svn default).
NOTE4: check Subversion Complete Reference for more info.
#MacOSX : Customize Launchpad with Launchpad-Control
Quoting from developer’s site:
Already upgraded to Mac OS X Lion? Yes? Well then you certainly know Launchpad, the “home for your apps” like Apple says.
A huge disadvantage of Launchpad is that every app located in your /Applications folder is shown. That means that you will see little helper programs like uninstallers or updaters, too.
These apps can’t be hidden from Launchpad easily because Apple does not provide any preference pane or tool to do so.
Launchpad-Control is a small tool which allows you to easily hide/unhide apps (and groups) from Launchpad in Mac OS X Lion.
NOTE: it is free, but be kind and make a donation to the developer, he will appreciate it very much. 😉
#MacOSX : IP Scanner Pro, Network Scanning for Dummies
You are accustomed to incomprehensible command line tools???
Finally I have the right solution: IP Scanner Pro
It’s all about friendlyness!!! You can ping, wake up, insert into whitelist, etc all the devices found with just one click.
I will show you just an image, you don’t need anything else! 😉

NOTE: I have hidden MAC address.
#MacOSX : Add Dock Spacing using OnyX
Onyx is a powerfull App which does a lot of things. You can tweak user interface too; what we want to do is adding invisible spaces in the dock.
- Start Onyx and enter your administrator password
- Go to Parameters tab
- Choose Dock tab
- Click on the buttons at the bottom: Applications or Others
- OnyX will now reboot the Dock
This is how it look like:
![]()
#MacOSX : Xlog, Logs As The Desktop Background [OUTDATED]
Ok, this is for sys admin and paranoid people.
If you want see system logging in real time on your desktop there exist an amazing app: Xlog
Here you can see a beautifull screen on how it looks like:

Sadly, Xlog is no longer available in the App Store and stopped working since Mac OS El Capitan.
NOTE: you can set Xlog preferences to start it automatically on login. 😉
NOTE2: you can choose text & background color and transparency.
