Author Archives: whitehatty
#MacOsX : Fix Mountain Lion Slow Shutdown
Ok, actually there are many good reasons to wait a bit of time before send a SIGKILL to processes (like giving them time to write things on disk or finish an upload on the iCloud), however the “slow” shutdown could be annoying, so try this:
sudo launchctl unload /System/Library/LaunchDaemons/com.apple.coreservices.appleevents.plist
sudo defaults write /System/Library/LaunchDaemons/com.apple.coreservices.appleevents ExitTimeOut -int 2
sudo launchctl load /System/Library/LaunchDaemons/com.apple.coreservices.appleevents.plist
This set the shutdown timeout to 2 sec instead of the default value (20).
#VMware Fusion: Script to Easily Install VMware Tools [OUTDATED]
If you run a linux guest VM, every time you update the kernel you need to reinstall VMwareTools for optimal performances.
After selecting Virtual Machine > Install VMware Tools you need to untar the archive and then run a script that ask you many question, etc.
This can be very tedious, so this is a little script that minimize typing:
#!/bin/bashtar xzf /media/VMware\ Tools/VMwareTools-*.tar.gz -C /tmpumount /media/VMware\ Toolssudo /tmp/vmware-tools-distrib/vmware-install.pl -dmkdir -pv ~/Desktop/VMwareSharedrm -v ~/Desktop/VMwareShared/*if [ -d /mnt/hgfs ]thenln -sv /mnt/hgfs/* ~/Desktop/VMwareShared/fivmware-userVMware now recommends to use the open-vm-tools-desktop provided by the Linux distribution of your choice.
NOTE: -d option implies default answers to install script (most of the time they are ok)
NOTE2: the script create a directory on Desktop with all directories shared by the host system with the VM
NOTE3: this script has been tested only on Ubuntu 12.04 LTS
NOTE4: this script install native VMware Tools, if you want you can install open tools instead, but you can’t install both at the same time!
#MacOsX : Web Hacking with Burp Suite
This is a legendary tool developed by the author of The Web Application Hacker’s Handbook: Finding and Exploiting Security Flaws (2nd edition).
Unfortunately there is no native Mac Os X version but Corsaire packed one. Since they updated the site, the link to download it provided in the aforementioned book is broken, so I will provide a new working one of the recently released version 1.5 1.6 of Burp Suite Free.
All rights reserved to Corsair and Portswigger.
The version at this link
DOWNLOAD HERE
is now outdated (it also requires JDK 6, which is no longer supported).
A free binary version for Mac OS has been made available:
Burp Suite Free Edition
See also here for a [much less powerful] alternative.
#MacOsX : Enable Quicklook Text Selection [OUTDATED]
Quicklook is a beautiful and powerful feature of Mac Os X (take a look here to know what is capable of) but it is somewhat weird that it doesn’t allow text selection.
To enable text selection in Quicklook:
defaults write com.apple.finder QLEnableTextSelection -boolean YES
killall Finder
NOTE: this trick stopped working with Mac OS X 10.11 and later.
#MacOsX : Show Remote Disks
There are Macs without disk drives. You can access CD/DVDs from another Mac over the network allowing remote disk.
This option allows you to always see remote drives within Finder:
defaults write com.apple.finder EnableODiskBrowsing -boolean YES
killall Finder
#Firefox : URL Keyword for Search Engines
Most browsers allow search to default search engine in address bar, but what if you want a different engine? You can switch on the right box, choose one and then start the search.
That’s suck!
So you can try this:
- click the little arrow in the search engine box to open the drop down menu.

- select Manage Search Engines…
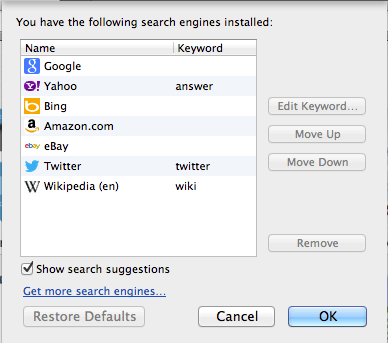
- select an engine and then click on Edit Keyword…
- add the keyword you prefer and then click OK


From now on, if you want make a search with the engine in the URL bar, construct your research like:
keyword query
Examples:
wiki power law distribution
answer AAPL growth
twitter Barack Obama
NOTE: if your keyword doesn’t work and your query is answered by the default search engine, try to change it! I have noticed that if you use the name of the service (e.g., Wikipedia, Yhaoo) most of the time the keyword doesn’t work. 😦
#Firefox & #Chrome : Fast Email Composer
If you are a pro, you know, you use the keyboard to do most of the work, right?
Then why click to open the mail client or a new compose window when you can do it in less then 10 character:
type
mailto:
in the address bar of your browser and let’s the magic happen! 😎
#MacOsX : How Cut & Paste Works in Mac OS X
Yep, Mac world is only about Drag & Drop but if you feel nostalgic of PC’s world you can move files the old way, just do this:
- selct file/files and hit
Command + C
- move to another location an hit
Command + Option + V
#MacOsX : Web Hacking with Paros
Paros is a web proxy that allows to intercept and modify all HTTP and HTTPS data between server and client, including cookies and form fields.
I will not explain how and why you use it, but if you are really interested, please take a look on the book: The Web Application Hacker’s Handbook: Discovering and Exploiting Security Flaws.
Unfortunately there is no native Mac Os X version but Corsaire packed one. Since they updated the site, the link to download it provided in the aforementioned book is broken, so I will provide a new working one. All rights reserved to Corsair and Paros Team.
Paros is no longer developed (it also requires JDK 6 which is not longer supported).
An alternative is a fork of it, Zed Attack Proxy, maintained by OWASP:
Zed Attack Proxy (ZAP)
#MacOsX : Reset NVRAM, PRAM and SMC
Sometimes after a software (system) or hardware upgrade even Macs can have some problems; if you have tried every solution without success you could try this.
Every Mac stores certain settings in a special memory area even if it is turned off. On Intel-based Macs, this is stored in memory known as NVRAM; on PowerPC-based Macs, this is stored in memory known as PRAM.
Resetting NVRAM and PRAM may solve lot of problems and could be required if you upgrade SSD or Mac firmware (more tips on SSDs here).
Another step to try is Resetting the System Management Controller (SMC). An SMC reset should only be attempted after all other standard troubleshooting has been performed.
#MacOsX : Disable Auto-Save and Versions in Mac OS X
Auto-Save and Versions are excellent features in Mac OS X, but some advanced users are annoyed by them as they often don’t want to save intermediate versions of their work.
Moreover some apps write lots of data on disk (e.g. iMovie and iBooks Author) and this can shorten the life of SSD (look here for more tuning for SSDs).
If you know the name of the app plist you want to disable auto-save and Versions for, you can just plug the name into the defaults write command:
defaults write app-plist ApplePersistence -bool noIf you don’t know it then you can find it with the following command:
osascript -e 'id of application "NAME OF APP"'Now if you enter the Versions window, auto-save list will be empty and there are no versions to restore to. You’ll probably want turn off File Locking too.
NOTE: some sandboxed apps require another command in addition:
defaults write app-plist AutosavingDelay -int 0This is expecially true for TextEdit as it is the only Apple app that uses “old-style” autosaving and this causes issues with the sandbox in Lion/Mountain Lion.
NOTE2: It seems that the preference can be set globally but it may cause the login process to become very slow and possibly cause other unexpected behaviour:
defaults write -g ApplePersistence -bool no#MacOsX : Turn Off File Locking
Mac OS X Lion has introduced automatic file locking for files that hasn’t been edited recently.
To Disable File Locking:
- open System Preferences > Time Machine
- click on Options
- uncheck the box next to “Lock documents [2 weeks] after last edit” or modify the value as preferred
- done 🙂

#CryptDB : HOWTO Compile on Ubuntu Linux [UPDATE 2]
First, what is CryptDB.
A SHORT PRESENTATION, very useful to understand how it works.
Second, reference system: Ubuntu Linux LTS 12.04.x 32bit 64bit (see this comment).
Third, [NEW] installation:
sudo apt-get udatesudo apt-get install git rubygit clone -b public git://g.csail.mit.edu/cryptdbcd cryptdbsudo ./scripts/install.rb .Done. It’s that simple now 😎
If it fails to compile, see THIS comment.
If you still do not succeed see THIS comment.
With recent version of Ubuntu (14.04 and 16.04) you might need to downgrade Bison, see THIS comment.
[OLD] installation:
- install needed packages:
sudo apt-get install automake bison bzr cmake flex g++ git gtk-doc-tools libaio-dev libbsd-dev libevent-dev libglib2.0-dev libgmp-dev liblua5.1-0-dev libmysqlclient-dev libncurses5-dev libntl-dev libssl-dev - create a directory, then download software to compile:
mkdir $HOME/cryptdb-inst

cd $HOME/cryptdb-inst

git clone -b public git://g.csail.mit.edu/cryptdb

wget http://es.csail.mit.edu/mysql-5.5.14.tar.gz

bzr branch lp:mysql-proxy - compile mysql-proxy:
cd mysql-proxy

sh ./autogen.sh

./configure --enable-maintainer-mode --with-lua=lua5.1

make

sudo make install - build CryptDB on MySQL:
cd $HOME/cryptdb-inst

tar xzf mysql-5.5.14.tar.gz

cp -R cryptdb/parser/mysql_mods/* mysql-5.5.14/

rm mysql-5.5.14/sql/sql_yacc.{cc,h}

cd mysql-5.5.14

mkdir build

cd build

cmake -DWITH_EMBEDDED_SERVER=ON ..

make

sudo make install

cd /usr/local/mysql

sudo chown -R mysql .

sudo cp support-files/my-medium.cnf /etc/my.cnf

sudo scripts/mysql_install_db --user=mysql --basedir=/usr/local/mysql/

sudo /usr/local/mysql/bin/mysqld_safe --lc-messages-dir="/usr/local/mysql/share/english/"

/usr/local/mysql/bin/mysqladmin -u root password 'letmein'
- Build CryptDB:
cd $HOME/cryptdb-inst/cryptdb

cp conf/config.mk.sample conf/config.mk

sed -i'' -e"1s%/home/nickolai/build%$HOME/cryptdb-inst%" conf/config.mk

make

sudo make install
- now, it’s time to read
cryptdb/doc/README, enjoy! 😉
NOTE1: you should create a user mysql to run DBMS for security reasons:
sudo groupadd mysql
sudo useradd -r -g mysql mysql
NOTE2: be very careful on each step and you wont fail.
#VMware Fusion : Fix Ubuntu Linux “Host SMBus controller not enabled!” [UPDATED]
Ubuntu guest instances in VMware sometimes come up with the boot error message:
piix4_smbus 0000:00:007.3: Host SMBus controller not enabled!This error is being caused because VMware doesn’t actually provide that level interface for CPU access, but Ubuntu try to load the kernel module anyway.
How to fix it:
-
sudo nano /etc/modprobe.d/blacklist.conf - add the line:
blacklist i2c-piix4 - reboot
NOTE: for older versions use blacklist i2c_piix4 instead.
NOTE: it works both in VMWare Fusion 5 and 6, and Ubuntu LTS 12.04 and 14.04
#MacOsX : VMware Fusion 5 vs. VMware Fusion 6 vs. VMware Fusion 7 vs. Parallels Desktop 7 [UPDATED]
I will not present functionalities here; it will be just a really brief benchmark.
Configuration:
- Hard Disk OCZ-AGILITY3 240 GB, firmware 1.15
- Graphics NVIDIA GeForce 9400M 256 MB
- Memory 8 GB 1333 MHz DDR3
- Processor 2.26 GHz Intel Core 2 Duo
- MacBook Pro 13-inch, mid 2009
- Software
- Hosts: Mac OS X Lion 10.7.4 (Parallels 7, Fusion 5), Mac OS X Mavericks 10.9.4 (Fusion 5, Fusion 6), Mac OS X Yosemite 10.10.4 (Fusion 6, Fusion 7)
- Guest: Windows 7
Some info:
- VMs have 2,5 GB RAM allocated
- VMs have 1 CPU allocated
- Parallels was tested when disk was new, while Fusion with half of the space occupied
- Parallels VM has optimize Windows performance on
- Fusion VM has disk buffering disabled
- Fusion 5.0.5, Fusion 6.0.4, and Fusion 7.1.2 were tested with Windows Aero OFF
| Component | Parallels 7.15106 | Fusion 5.0.[1-3] | Fusion 5.0.5 | Fusion 6.0.4 | Fusion 7.1.2 |
| Processor: | 4.4 | 4.4 | 4.4 | 4.4 | 4.4 |
| Memory (RAM): | 5.5 | 5.5 | 5.5 | 5.5 | 5.5 |
| Graphics: | 5.0 | 5.0 | 5.9 | 5.9 | 4.7 |
| Gaming graphics: | 4.4 | 4.2 | 5.1 | 5.2 | 4.2 |
| Primary hard disk: | 7.2 | 7.7 | 7.4 | 7.4 | 7.4 |
NOTE1: Fusion 5 seems to start and stop a bit slower than Parallels 7. Fusion 6 doesn’t improve, but SSD might be slower after this time than it was originally.
NOTE2: disabling Aero drastically improve Graphics performance, so do it!
NOTE3: Fusion 6 improve 3D Graphics performance over Fusion 5, but just slightly, so it is not worth an update. IMHO.
NOTE4: the combination of Mac OS X Yosemite and Fusion 7 has poor graphics performance. It is actually a big regression. I think Apple is to blame here.
#WP7 : LG Optimus 7 Unlock + Interop Unlock + Root Tools
If you want install XAP files without a developer account you can do it by modifying some registry keys:
- First go to MFG and follow the path 7.Engineer Menu > 6.Other Settings > Edit Registry
- Set the following fields:
- Select ROOT_PATH: HKEY_LOCAL_MACHINE
- Input SUB_PATH: Comm\Security\LVMod
- Input KEY and Select data type: DeveloperUnlockState DWORD
- Input data: 1
- Click Set button
To avoid Zune undo to default settings:
- Go to MFG and follow the path 7.Engineer Menu > 6.Other Settings > Edit Registry
- Set the following fields:
- Select ROOT_PATH: HKEY_LOCAL_MACHINE
- Input SUB_PATH: Software\Microsoft\DeviceReg
- Input KEY and Select data type: PortalUrlProd DWORD
- Input data: leave this field empty
- Click Set button
- Go to MFG and follow the path 7.Engineer Menu > 6.Other Settings > Edit Registry
- Set the following fields:
- Select ROOT_PATH: HKEY_LOCAL_MACHINE
- Input SUB_PATH: Software\Microsoft\DeviceReg
- Input KEY and Select data type: PortalUrlInt DWORD
- Input data: leave this field empty
- Click Set button
From now on your device is unlocked in developer mode, but you cannot install homebrew apps that modify registry keys. You need Interop Unlock:
- Go to MFG and follow the path 7.Engineer Menu > 6.Other Settings > Edit Registry
- Set the following fields:
- Select ROOT_PATH: HKEY_LOCAL_MACHINE
- Input SUB_PATH: Software\Microsoft\DeviceReg\Install
- Input KEY and Select data type: MaxUnsignedApp DWORD
- Input data: 300
- Click Set button
NOTE1: if you want install very nasty apps then you need WP7 Root Tools.
NOTE2: Unlock & Interop Unlock works on WP7 Tango too.
NOTE3: to lock device again set DeveloperUnlockState to 0 (zero).
#MacOSX : Make your Mac a Wireless Network Bridge
Sometimes you need to extend wireless field; you can do it transforming your Mac as a Wireless Network Bridge.
Why your Mac? Maybe a new shining Mac Book Pro? Well, let’s say your city has been hit by a big earthquake, so you had to leave your house, but your wireless network still works. Mobile Network won’t work due to excessive overhead but you can still access internet to contact your friends and family. Sharing your internet connection give this chance also to many other people (this has been happened to me recently).
First you need a Switch or a Router or a Wireless Access Point and Ethernet cables.
Then:
- Connect your mac to your wireless network
- Connect Switch / Router / Wireless Access Point to Mac Ethernet port
- Go to System Preferences -> Sharing
- Check Internet Sharing
- Share your connection from: Wi-Fi
- To computers using: Ethernet and Bluetooth PAN
- Let DHCP enabled
NOTE: this way you can connect to internet while you can maintain a secure distance from damaged buildings.
#MacOSX : Subversion Server
You know, Mac OS X is a UNIX system based on FreeBSD, so you can do a lot of NERD things out of the box.
This time you will learn how to setup a Subversion Server:
- Open Terminal app
- Type:
mkdir -p /Library/Subversion/Repository

cd /Library/Subversion/Repository

svnadmin create myproject - Great! Now that you have created the first repository, you need to configure it; type:
vim /Library/Subversion/Repository/myproject/conf/svnserve.confYou’ll see ### commented lines. The lines with the single “#” comment marks are the ones we need to edit. You’ll want to remove the comments (#) and customize these settings to suit your project’s needs:
- password-db : this specify text file that stores the usernames and passwords of authorized users for your repository. Unless otherwise specified, it will be assumed that this file is stored in your projects “conf” directory. When you create your repository a “passwd” file is created by default.
- realm : realm tells clients what they are connecting to. It’s recommended you customize this to something like <Project Name> Subversion Repository.
- anon-access : this directive indicates what anonymous users are allowed to do with your repository. You should set it to none.
- auth-access : determines what permission level authorized users will have. In almost every case this will be set to write.
- Now you must edit password-db file; you can add as many users to your repository(s) as you want. Add at least one user for yourself so that you can begin committing to your repository:
vim /Library/Subversion/Repository/myproject/conf/passwd - Next you need to change permissions on the Repository directory so that svnserveis permitted to make changes to the files stored there:
sudo chown -R root:admin /Library/Subversion/Repository
sudo chmod -R ug+rwX,o= /Library/Subversion/Repository - Start Subversion Server:
svnserve -d -r /Library/Subversion/Repository - Check if it works:
cd
mkdir project
cd project
svn checkout --username <user> --password <user_password> svn://localhost/myproject - If it works you should have myproject directory in Repository. Well Done.
NOTE1: /Library/Subversion/Repository is just an appropriate example for Repository, but you can choose every other location.
NOTE2: in svnserve.conf and passwd files remove every white spaces at the beginning of non empty lines or it will not work.
NOTE3: if you want allow users to connect from internet you should set port forwarding on TCP port 3690 (svn default).
NOTE4: check Subversion Complete Reference for more info.
